1. What You Need
| Item | Purpose |
|---|---|
| Raspberry Pi 5 running Raspberry Pi OS | Acts as the Linux host computer. |
| USB-to-Serial RS-232 adapter | Creates a Linux serial device such as /dev/ttyUSB0. |
| DB9 null modem adapter or null modem cable | Crosses transmit and receive lines so the Pi and terminal can talk. |
| DB9-to-DB25 serial adapter/cable | Connects the DB9 serial side to the VT420 DB25 Comm1 RS-232 port. |
| DEC VT420 terminal and keyboard | The physical text terminal. |
2. Connection Illustration
2. Cable Path
3. Illustration
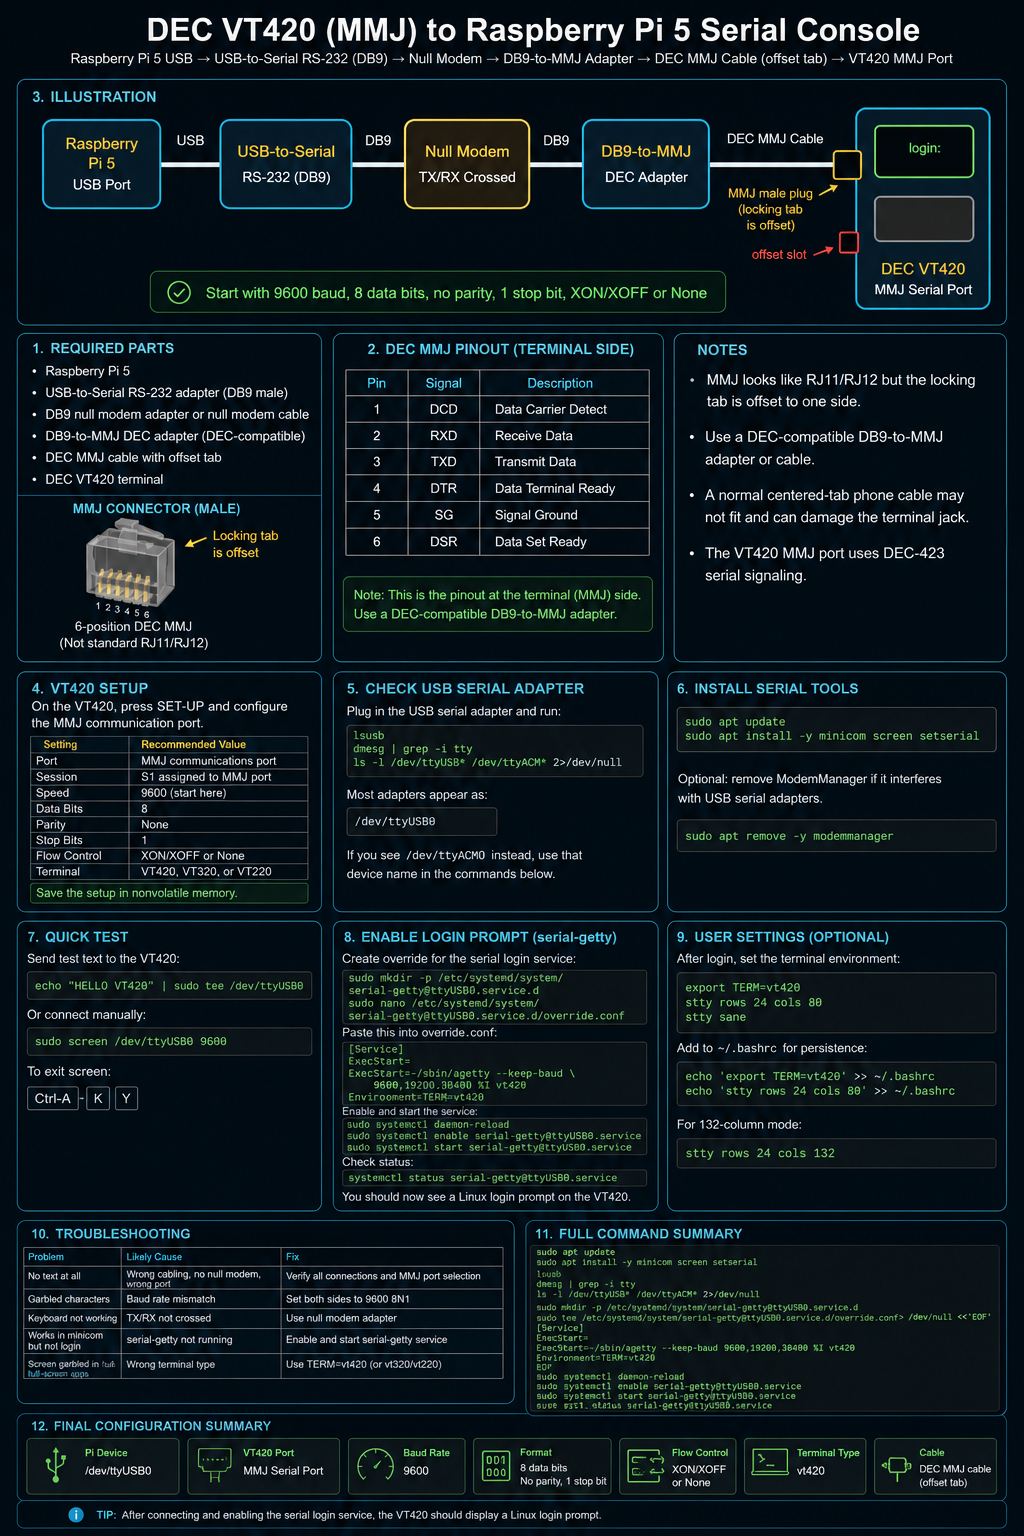
| Setting | Recommended Value |
|---|---|
| Session | S1 = Comm1 |
| Connector | Comm1 DB25 RS-232 |
| Transmit Speed | 9600 to start; later try 19200 or 38400 |
| Receive Speed | Same as transmit speed |
| Data Bits | 8 |
| Parity | None |
| Stop Bits | 1 |
| Flow Control | Start with XON/XOFF or None. Avoid hardware flow control unless fully wired. |
| Terminal Type | VT420, VT320, or VT220 |
4. Check the USB Serial Adapter on the Pi
Plug the USB serial adapter into the Raspberry Pi 5 and run:
lsusb
dmesg | grep -i tty
ls -l /dev/ttyUSB* /dev/ttyACM* 2>/dev/null
You should see something like:
/dev/ttyUSB0
If you see /dev/ttyACM0 instead, use that device name in the commands below.
5. Install Serial Tools
sudo apt update
sudo apt install -y minicom screen setserial
Optional but useful: remove ModemManager if it grabs USB serial adapters.
sudo apt remove -y modemmanager
6. Quick Manual Test
Before enabling a login prompt, test the serial line.
sudo screen /dev/ttyUSB0 9600
Or use minicom:
sudo minicom -D /dev/ttyUSB0 -b 9600
To exit screen, press:
Ctrl-A then K then Y
7. Enable a Login Prompt on the VT420
Create a systemd override for the USB serial login service:
sudo mkdir -p /etc/systemd/system/[email protected]

sudo nano /etc/systemd/system/[email protected]/override.conf
Paste this:
[Service]
ExecStart=
ExecStart=-/sbin/agetty --keep-baud 9600,19200,38400 %I vt420
Environment=TERM=vt420
Enable and start the service:
sudo systemctl daemon-reload
sudo systemctl enable [email protected]
sudo systemctl start [email protected]
Check status:
systemctl status [email protected]
You should now see a Linux login prompt on the VT420.
8. Make Sure Your User Can Log In
If using Raspberry Pi OS Bookworm or newer, make sure your normal user has a password:
passwd
If you want to create a dedicated terminal user:
sudo adduser vtuser
sudo usermod -aG dialout,tty vtuser
9. Optional: Set Terminal Type After Login
Add this to the user’s ~/.bashrc if the terminal display acts odd:
export TERM=vt420
stty rows 24 cols 80
stty sane
For 132-column mode, use:
stty rows 24 cols 132
10. DB9 to DB25 Serial Reference
Typical PC-style serial adapter mapping:
| Signal | DB9 Pin | DB25 Pin |
|---|---|---|
| TXD | 3 | 2 |
| RXD | 2 | 3 |
| GND | 5 | 7 |
| RTS | 7 | 4 |
| CTS | 8 | 5 |
| DTR | 4 | 20 |
| DSR | 6 | 6 |
| DCD | 1 | 8 |
11. Troubleshooting
| Problem | Likely Cause | Fix |
|---|---|---|
| No text at all | Wrong device, wrong cable, no null modem, wrong VT420 port | Check /dev/ttyUSB0, use Comm1 DB25, add null modem adapter. |
| Garbled characters | Baud rate mismatch | Set both Pi and VT420 to 9600 8N1. |
| Login appears but keyboard does not work | TX/RX not crossed or flow control issue | Use null modem and set flow control to None or XON/XOFF. |
| Prompt appears, but full-screen apps look wrong | Wrong terminal type | Use export TERM=vt420 or try vt320 / vt220. |
/dev/ttyUSB0 changes after reboot |
USB enumeration changed | Use a udev rule, or keep the adapter in the same USB port. |
12. Optional Stable Device Name
Find adapter details:
udevadm info -a -n /dev/ttyUSB0 | less
Create a rule:
sudo nano /etc/udev/rules.d/99-vt420.rules
Example rule:
SUBSYSTEM=="tty", ATTRS{idVendor}=="067b", ATTRS{idProduct}=="2303", SYMLINK+="vt420"
Reload udev:
sudo udevadm control --reload-rules
sudo udevadm trigger
Then use:
/dev/vt420
13. Final Working Command Set
sudo apt update
sudo apt install -y minicom screen setserial

lsusb
dmesg | grep -i tty
ls -l /dev/ttyUSB* /dev/ttyACM* 2>/dev/null

sudo mkdir -p /etc/systemd/system/[email protected]

sudo tee /etc/systemd/system/[email protected]/override.conf > /dev/null <<'EOF'
[Service]
ExecStart=
ExecStart=-/sbin/agetty --keep-baud 9600,19200,38400 %I vt420
Environment=TERM=vt420
EOF

sudo systemctl daemon-reload
sudo systemctl enable [email protected]
sudo systemctl start [email protected]
systemctl status [email protected]
14. Recommended Starting Configuration
- Pi device:
/dev/ttyUSB0 - Baud:
9600 - Format:
8N1 - Flow control:
NoneorXON/XOFF - Terminal type:
vt420 - VT420 port: Comm1 DB25 RS-232
Note: The Raspberry Pi GPIO UART settings in raspi-config are not required for this USB adapter method. Those settings are only needed if you wire directly to the Pi GPIO serial pins.